Thursday, June 29, 2017

Project 4: Multimedia (Stop-Motion Video)

Activity Report

1. Explore your Topic (1-2 hours)

Stop motion is a fascinating type of video that everybody loves! My knowledge of it is limited having allowed one 2nd grade class to tinker with the Stop Motion Studio app for ios for 30 minutes. They would have continued playing with it for days! It was enough for me to see that stop motion video creation can be useful as a tool to create a final product as well as creative exploration. It doesn’t take long to find multiple sources of very useful documentation. Traggianese (2016) was very straightforward in her advice to first settle on a stop-motion app, then allow students time to rehearse their story keeping them in groups no larger than 4. The author also inspired the camera stability setup that I ended up using: pieces of wood creating a platform set across 2 stools. Dahl (2016) added detail to the particular app I plan to use, Stop Motion Studio. The author points out that the hundreds or even thousands of pictures taken throughout the creation process are not stored on the camera roll but within the app itself. Dahl included several photos of the process giving me an excellent vision for how to proceed. The most useful source for me and that I would recommend is a 20 minute Youtube video by Gach (2015). The author’s tutorial is filled with stop-motion animation examples that are certainly inspiring. But more importantly, her explanation of how to plan pictures (7-10 shots per second), choose a background, and steady the camera was very helpful.

References


Dahl, C. (2016). Stop motion made easy. Retrieved from http://www.cassiedahl.com/2016/04 /stop-motion-made-easy.html

Gach, A. M. (2015). Stop motion lesson. Retrieved from https://www.youtube.com /watch?v=E-r3bLTRPQg&t=23s

Traggianese, A. (2016). 5 Tips for stop-motion videos. Retrieved from https://educationcloset.com /2016/01/21/5-tips-stop-motion-videos/


2.  Learning Goal(s) (30 min - 1 hour)

My goal is to create a stop-motion video of a fractured fairy tale as an example for 5th grade students. As part of a creative writing unit, they will write a fairy tale based on a traditional tale but will change, at a minimum, the characters and setting of the story. They may also change the general idea of the ending of the story. Then they will script that story for a stop-motion video and create it using the Stop-Motion Studio app for either ios or android.

My stop-motion video, therefore, should have all of the elements I expect of students with a solid story, characters, a clear setting, and conclusive ending.  I will use the camera timer function and have the playback speed set to approximately 8 pictures per second. In addition, I will record the narrative story once the pictures are all taken and add a background soundtrack.


3.  Do (9 hours)
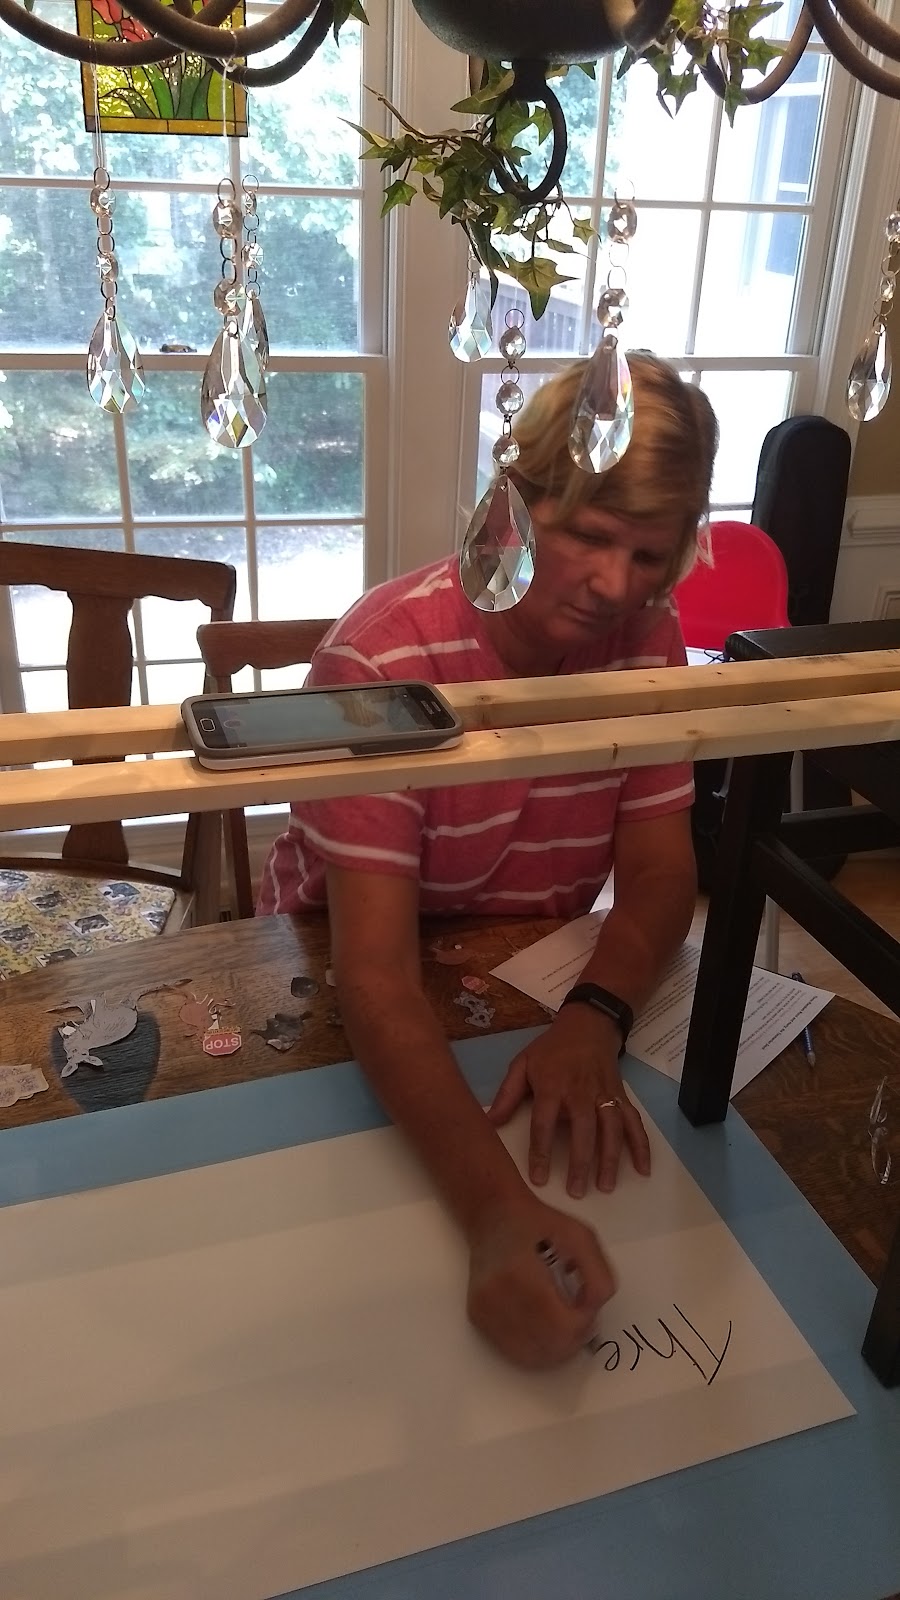
Because my goal was to end this project with a product I could use as an example for a specific unit, I had to do significant up-front work before I ever got to the fun of the “Do:” animating my 2D characters for a stop-motion video. Between writing the story and editing it with the goal of cutting it in half, finding appropriate images for characters and props (making fairy bread takes time!), and then trimming the characters, I had already put in at least 4 hours. I brainstormed a bit searching for the perfect background (I wanted something reminiscent of the Australian outback, but my characters were camouflaged by everything I tried) when I realized something as simple as poster board is the answer - contrasting color and smooth, easy to slide on surface were perfect. See Section 4. Capture and Describe for the remainder of my adventure.


4.  Capture & Describe (1 hour)

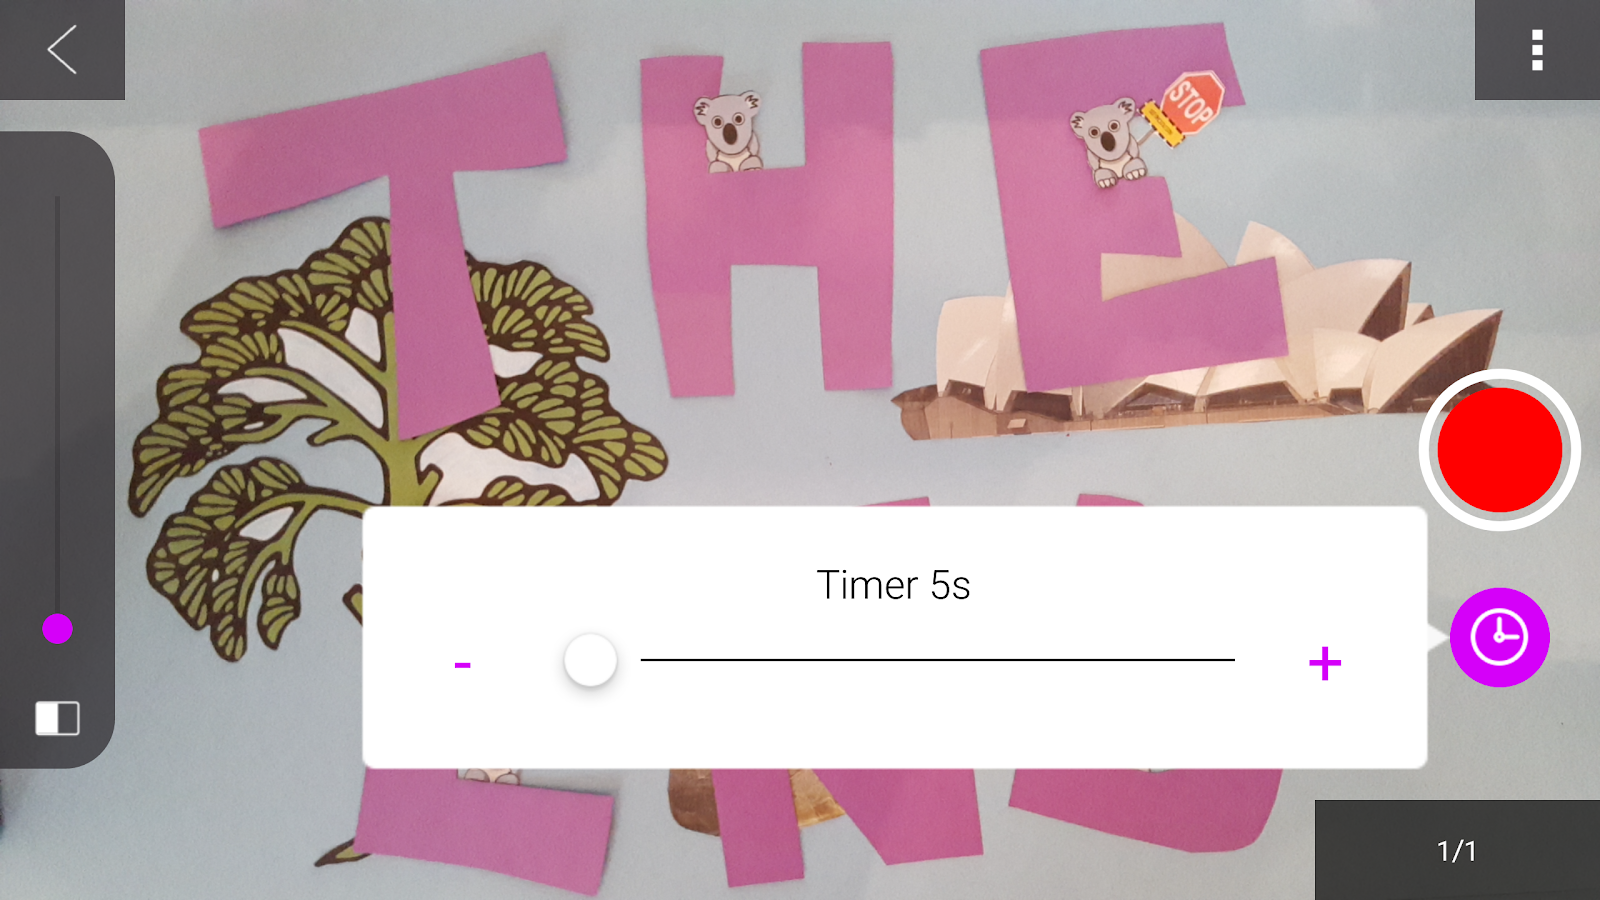
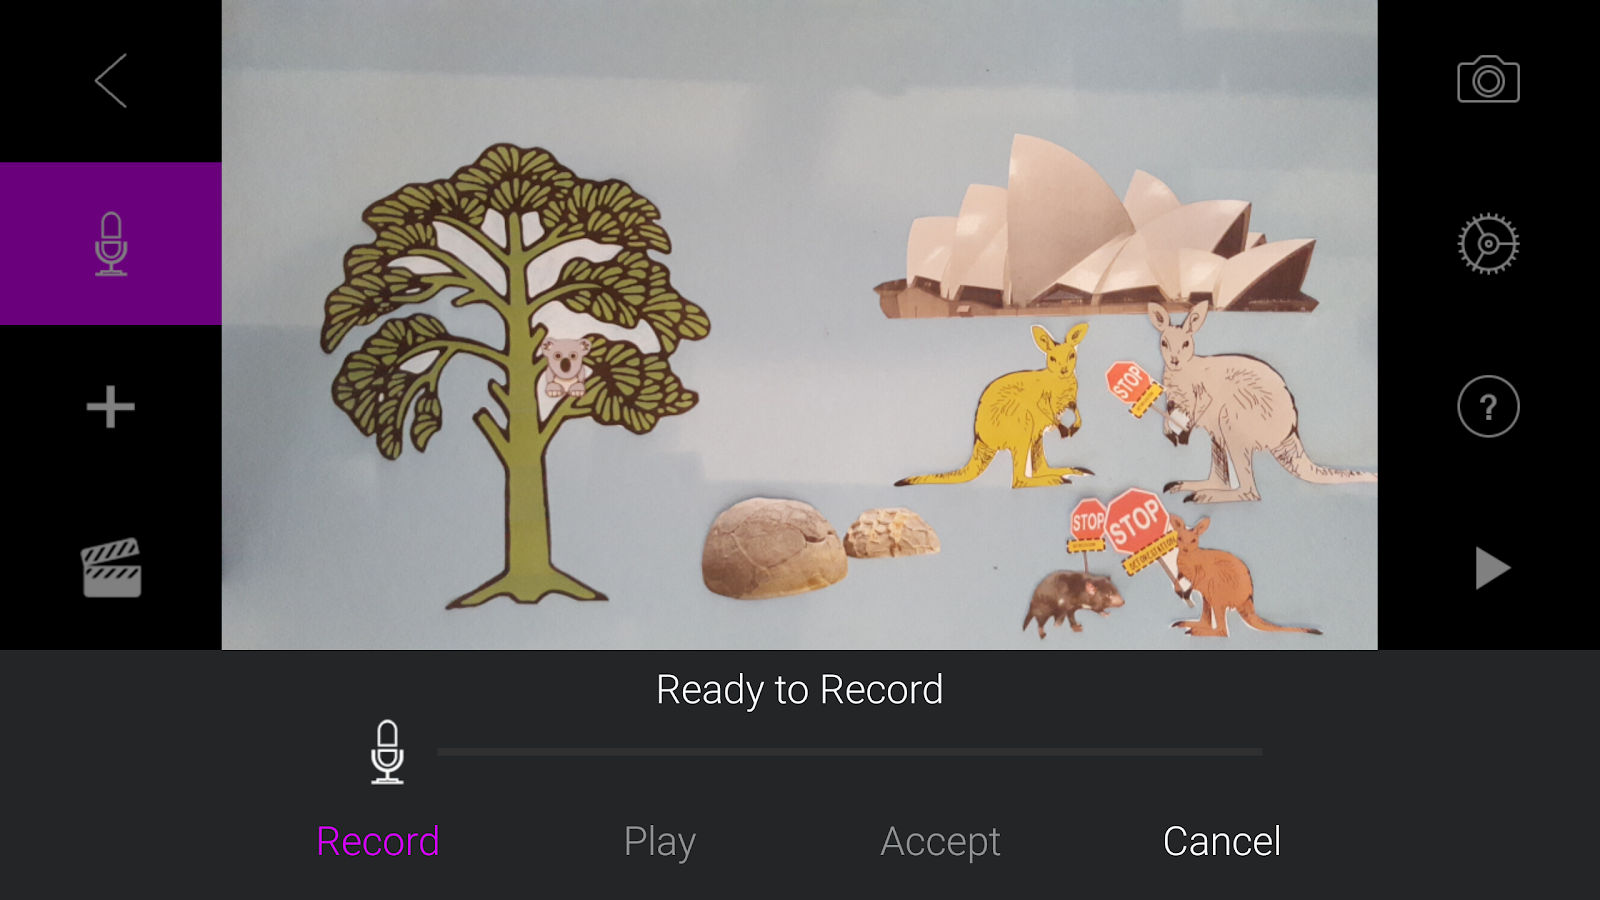
Knowing that my 2-minute story would require about 1000 pictures, all perfectly placed and paced, I approached the “Do” segment with a bit of anxiety. My first task was to play with the app, Stop Motion Studio, and tinker with all of its features. Two that were invaluable were the timer option for taking pictures and the ability to add narration within the app. Screenshots are below.
timer.png


recording voice.png


Next up was setting the stage, including the perfect scaffolding for the camera (my phone).
IMG_20170628_125932847.jpg


I knew from my research that I needed 7-10 pictures per second so my first goal was to take 30 pictures of one of my characters entering the stage. The video looked good, but I could tell it wasn’t going to be long enough to read the narration. The majority of stop-motion videos I’ve seen online don’t have any narration -- the animation tells the story. But my goal is to use stop-motion as a tool for creating a specific product. My narration wasn’t optional. I narrowed the solution down to two choices. One: I could shoot one scene at a time and practice the narration to see how the timing worked out. If the video scene wasn’t long enough to accommodate the narration, I could add more animation or even just still shots once all the characters were in place. Or two: I could create it in short scenes, add each scene on a separate Powerpoint slide, narrate the whole thing in Powerpoint, and save it as an mp4.

I decided to go for option one: using the Stop Motion Studio app for the pictures, video, and narration. To make it work, I did a little math for each scene. First, I timed the narration for that scene in seconds. Then, I multiplied that number by 10 (since I knew I wanted between 7 and 10 pictures per second). Next, I multiplied the product of the first by 5 because the timer on the camera was set to take a picture every 5 seconds. Finally, I divided that answer by 60 to convert the final time to minutes, an easier unit to use on the timer I was using.


1. (time of narration in seconds) *(10 pictures per second) = A
2. (A)*(5 seconds) = B
3. B/60 seconds = C in minutes

So, I had the camera on my phone up there snapping shots every 5 seconds while I had a separate timer telling me how long I needed to make the animation last. Moving an object in a 5-inch space back and forth keeping my fingers out of the scene for 5 minutes can be quite tedious! And considering that there were 15 four-10 minute scenes in my story (a total of 1390 pictures in the final product), well, it took all day to get the job done. But it’s interesting to note in the finished product how much my animation improved over the course of the day! Confession: I did call in for assistance in moving characters for some scenes (and for taking a few pictures).


IMG_20170628_162657419.jpg


Once the scenes were all shot, it was easy to add the narration and easy to see how invaluable doing the math ahead of each scene actually was. I uploaded each scene individually to YouTube, used the fabulous video editor available in YouTube to splice all my scenes together and even add a background audio track and credit on the final slide for that track.

While I failed miserably at completing the “do” within 9 hours (probably more like 14-15 hours), I believe the experience was worthy of the time spent. And I’m still far from the mastery level!


5.  Toolset Story (15 min)
I used a Google Doc to write the script (with red lettering for stage instructions). The cast of characters flowed from the script. I used Pixabay.com and downloaded all of the images I would use in the stop-motion video, taking care to use only images that were licensed as “Free to use for commercial use. No attribution necessary.” I used the Android version of Stop Motion Studio on my phone because I will not have iPads for student use next year and it may well be that the only way I can do this project with students is in centers allowing groups to share my phone. I uploaded all 15 scenes to YouTube and used the video editor on Youtube to create one, cohesive story. And finally, I used a background track (Leon Berger's Outback Prayer - Cavendish - BBF) from the YouTube editor which means it’s free, but also means that the track owner can display his/her advertisements on my video.

6.  Skillset Needed (30 min)

The skills needed for this project included: ability to find instruction regarding creating stop-motion video (from tips such as how to keep the camera stationary to how many pictures to take), patience for physical character creation (and cutting them out in my 2D version!), troubleshooting to determine an appropriate background (my first choice blended too much with one of the characters), time to take enough pictures per scene to create a free-flowing video, general understanding of the different tracks in video editing, and time. Overall, the Stop Motion Studio app makes it easy for a storyteller to produce their story as long as the user is willing to invest a little time understanding the basics.

7.  Next Steps for My Learning (1 hour)

Having invested this amount of time in such a simple stop-motion video story (2D, simple movement, one track of audio), I can now see how easy it will be to model for and then mentor young students in their own stop-motion video creation. However, it would need to be a much shorter end product due to the amount of time required to get just a few seconds of footage. For example, to get a 13-second scene, it takes a minimum of 11 minutes just to physically take the number of pictures needed for smooth animation.

For 4th and 5th grades, a project similar to mine could possibly be accomplished by having the class write the story together and then having groups of students each complete one scene of the story. Obviously, multiple devices would help! In addition to this 2D style, I would give them the option of completing the video using either the whiteboard exclusively or 3D characters if desired. Another useful skill for a subset of stop-motion would be time lapse video. All of these aspects will require more learning on my part, but I believe would be beneficial for students and, therefore, worth the effort.

The Final Product: 3 Random Roos and Harry, the Tasmanian Devil


Thursday, June 22, 2017

Project 3: Audio (Podcast - Booktalk)

Amber Brown is Not a Crayon - A Book Talk with Sound Clips


Purpose: I would like to start a library of student and teacher-created book talks in my elementary school. The purpose of this podcast is to serve as an example to students of my expectations for an audio book talk.

Audience: The primary audience for this podcast is 3rd-5th graders. Teachers who are also requiring audio book talks may use it in their classrooms as well.

Tools: I used Audacity to record the podcast along with Logitech headphones with a built-in microphone. I found that starting consonants were cut off when I tried using my laptop's built-in microphone. In addition, I used sound files from 3 different sites. I used VLC to convert the *.wav file created by Audacity to an mp3 file. I then used archive.org to upload my *.mp3 file which created an embeddable weblink for the file. Finally, I have published the product and information here on multimedialsd.blogspot.com.

Reflection: This was a fun project, one that I believe students would also enjoy. However, finding sound files that don’t require attribution was a struggle. Adding metadata information to the audacity file would be beyond my expectations for young children. I will encourage students to create their own sound files to avoid this problem. Since we are posting this to a website, adding credits is not a problem. However, if the files are just being uploaded to a repository by students, then the attribution issue gets a little more complicated.

References

ABC Open. (2012). Children’s classroom / Licensed through Creative Commons Attribution-NonCommercial 3.0 Unported (CC BY-NC 3.0). Retrieved from http://www.freesound.org/people/abcopen/sounds/166207/?page=2#comment

Simion, D. (2017). Airplane takeoff /  Licensed through Creative Commons Attribution-NonCommercial 3.0 Unported (CC BY-NC 3.0). Retrieved from http://soundbible.com/2195-Airplane-Takeoff.html

Staab, M. (No Date). The typewriter / Licensed through Creative Commons Attribution-NonCommercial 3.0 Unported (CC BY-NC 3.0). Retrieved from https://musopen.org/music/2000/leroy-anderson/the-typewriter/


Friday, June 16, 2017

Project 2: Screencast Video

Title: How to Create a Simple Video in Microsoft Powerpoint
Audience: Teachers and upper elementary students
Purpose: This screencast was made to demonstrate in 3 minutes how to convert any Powerpoint slideshow to a video file. In this example, users will learn how to enter a title, insert a video, insert an image, and save the file as an mp4.
My Uses: I will use screencasting (and even this specific video) to teach students how to convert their slideshows into mp4 files. In addition, I will use it during professional development with teachers to show the power of this teaching tool.
My Learners’ Uses: Often student iPad applications (e.g. iMovie movie trailer templates) are fixed and do not offer a way to add references/citations to a finished product. This method will allow students to insert their product in Powerpoint, add a slide with additional information and save the entire file as an mp4. Teachers will learn how to create instructional videos for students as well as how to save any Powerpoint as a video for easy sharing.


Now, please enjoy the video!


Friday, June 2, 2017

20 - Games and Simulations Principle 1: Match Game Types to Learning Goals

Brief Definition
Clark and Mayer (2011) report that despite game-based learning’s continued popularity it remains challenging to definitively quantify its effectiveness at increasing learning; however, there are some principles that do influence the effectiveness of game-based learning. Principle 1 suggests that the design of the game should match the content of the lesson. For example, a highly conceptual class probably won’t go over as well in a race-type environment as it would in a simulation.

An Artifact
Poki.com offers several games to practice typing skills. This one, the Treasure Dive Game, allows the user to choose from four speeds: easy, normal, very hard, and ludicrous. Three sharks with different not-so-easy words to type are headed straight for the diver who’s trying to get treasure. As soon as the typer allows the first shark to swim all the way the screen without successfully typing that shark’s word, the expedition is over. While the graphics aren’t fantastic (although I’ve seen worse!), the game does what it’s supposed to do: gives the user typing practice at the speed right for them in an entertaining environment that matches the skill. Poki.com’s games do a good job applying Games and Simulations Principle 1.

gbl.JPG

References

Clark, R. C., & Mayer, R. E. (2011). E-learning and the science of instruction: Proven guidelines for consumers and designers of multimedia learning. San Francisco, CA: Pfeiffer.

19 - Thinking Skills Principle 2: Consider a Whole-Task Course Design

Brief Definition
Teaching thinking skills requires specific training that is related to the type of thinking that is the goal of the training (creative, critical, metacognitive). Clark and Mayer (2011) suggest that using Thinking Skills Principle 2, whole-task instruction, a type of guided discovery, is the superior choice “for more experienced learners who are not as easily overloaded and for learning of far transfer tasks that benefit from a more flexible mental model of the skills involved” (p. 355). Three elements characterize whole-task instruction: a) Problem-Centered, b) Guided-Learning, and c) Inductive-Learning.

An Artifact
The Stanford University’s d.school offers a Virtual Crash Course, a 90-minute introduction to Design Thinking, a topic that takes much longer and requires experience to fully grasp. However, this introductory is an excellent overview of the entire concept, but broken down into small minute-by-minute steps. The instructors introduce a problem, and then in very short segments, explain what to do and why before they let participants practice. A timer with music and a brief written reminder of the task guides learners through the process. Learners are encouraged to use the evidence they gain from their partner through direct interview and through their own insight to offer solutions to the uncovered problem. The d.school understands how to apply Thinking Skills Principle 2.

Thinking.JPG

References

Clark, R. C., & Mayer, R. E. (2011). E-learning and the science of instruction: Proven guidelines for consumers and designers of multimedia learning. San Francisco, CA: Pfeiffer.

18 - Learner Control Principle 2: Make Important Instructional Events the Default

Brief Definition
In an environment similar to that for Learner Control Principle 1, learners who have more control of their e-learning experience will benefit more when practice problems and even extra practice problems are set to appear as a default as the learner navigates the course options. Applying Learner Control Principle 2 better ensures that users will proceed through the examples and practice problems, and therefore, will perform better on content assessment (Clark and Mayer, 2011).

An Artifact
GCFLearnFree.org’s tutorial “Introduction to Division” does an excellent job guiding the user through examples (including some with real-life application) and then practice problems. This snippet shown below is the 5th set of practice problems (scaffolded where the first set just applies the very early stages of division) in this short tutorial. Notice the mechanism the practice use for feedback: red box and shaded for wrong answer; happy orange 12 for right answer. At the very bottom of the screen is an opportunity for even more practice with an optional “assessment.” This tutorial could have been spot on with Learner Control Principle 2 had they simply left out the idea that the assessment is optional and offered it as the next step after this last set of practice problems.


References

Clark, R. C., & Mayer, R. E. (2011). E-learning and the science of instruction: Proven guidelines for consumers and designers of multimedia learning. San Francisco, CA: Pfeiffer.

17 - Learner Control Principle 1: Give Experienced Learners Control

Brief Definition
In spite of research that shows that in general, learners exhibit poor decision making skills when given too much control in e-learning, Clark and Mayer (2011) highlight a few cases where more learner control is better than less. The perfect scenario for applying Learner Control Principle 1 would be learners who have already been introduced to the content area. Learners who: a) are being exposed to more advanced subjects in the content, b)  exhibit “good metacognitive skills” (p. 319), and c) are attempting an e-course that is straightforward and uncomplicated.

An Artifact
CoolMath4Kids.com not only offers elementary math help, but it’s also rich with examples of how to and how not to apply multimedia design principles. In the unit, Equivalent Fractions, Part 2, the learner is in a more advanced level than the introduction to the subject in Part 1 and it is a straightforward concept. In addition, in order to benefit from this set of non-animated with no audio tutorials, the user would have to have “good metacognitive skills, as mentioned previously. Therefore, the fact the user has complete control of the lesson by pacing themselves with either the “Continue” button or by clicking on the desired page number at the bottom of the screen shows that the developer correctly applied Learner Control Principle 1.

learner 1.JPG

References

Clark, R. C., & Mayer, R. E. (2011). E-learning and the science of instruction: Proven guidelines for consumers and designers of multimedia learning. San Francisco, CA: Pfeiffer.

16 - Practice Principle #3: Provide Effective Feedback

Brief Definition
Clark and Mayer (2011) point out that while just the right amount of practice increases learning in e-courses, adding effective feedback to explain incorrect responses is the proper use of Practice Principle #3. However, research shows that there is a perfect amount and method for providing explanatory feedback. In broad content common in science, the creation of such feedback can be quite complicated and add significant time to course development.

An Artifact
A very common grammar error, correctly distinguishing between the words “Affect” and “Effect”, is tackled in an e-lesson by GrammarMonster.com. With a similar setup as the previous example, the user must take the time to read through the lesson. For this lesson, there are no graphics - only text. And then, for a quick check, the user can take a few minutes to click through the practice sentences in the interactive test. When I checked to see whether the platform offered feedback, I was disappointed to see that it was only a big red X. Something as simple as ‘Remember, “affects” is a verb and in this sentence, a verb is required’ may have benefited learners and met Practice Principle #3.

practice - 2.JPG
practice - 2-2.JPG


References

Clark, R. C., & Mayer, R. E. (2011). E-learning and the science of instruction: Proven guidelines for consumers and designers of multimedia learning. San Francisco, CA: Pfeiffer.

15 - Practice Principle #1: Add Sufficient Practice Interactions to e-Learning to Achieve the Objective

Brief Definition
Practice makes perfect! According to Clark and Mayer (2011), in e-learning, achieving the right balance between instruction and practice is challenging. Some practice is effective; however, research shows that getting into the realm of “over-learning,” which is different for different content, does not increase learning.

An Artifact
GrammarMonster.com offers some excellent basic grammar e-courses. They are segmented by topic. This is in the “Easily Confused Words” category and is called Accept and Except. There are some excellent components in this lesson. For example, notice the graphic in the first image below. The images are perfect pictorial explanations of the difference between the two words. However, as shown in the second image, the all-text lesson continues beyond the images to more in-depth written explanations of the words. There is even additional information in text boxes. And then after the user has explored all of the information and read the examples, the top right corner of the screen offers practice through an “interactive test.” If all other principles had been appropriately applied in this lesson and, therefore, some knowledge transferred, then the practice problems/sentences would be an effective application of Practice Principle 1.

practice - 1.JPG

practice - 1-2.JPG

References

Clark, R. C., & Mayer, R. E. (2011). E-learning and the science of instruction: Proven guidelines for consumers and designers of multimedia learning. San Francisco, CA: Pfeiffer.


14 - Worked Example Principle #3 - Include Instructional Explanations of Worked Examples in Some Situations

Brief Definition
Clark and Mayer (2011) draw upon research when they suggest that adding further explanation to worked examples may benefit learning in some cases. These situations include a) when content that is geared more toward grasping the concepts than gaining problem-solving expertise, b) when students are relying only on the explanation with no “self-explanation” questions, and c) when the content is mathematics.

An Artifact
CoolMath4Kids has great tutorials on elementary math concepts such as the one featured here, Division: Standard Algorithm. The teacher doesn’t just work division problems. She does a great job working multiple example problems and explaining why various responses work or don’t work in the equation. See the image below for an example of the Worked Example Principle #3.


Worked 3.JPG
References

Clark, R. C., & Mayer, R. E. (2011). E-learning and the science of instruction: Proven guidelines for consumers and designers of multimedia learning. San Francisco, CA: Pfeiffer.

13 - Worked Example Principle #1: Fade from Worked Examples to Problems

Brief Definition
Worked examples are instructions that lead the user through a series of steps showing exactly how to find a solution. Clark and Mayer (2011) suggest that while these straightforward, piece by piece instructions are helpful to users, it is even more helpful when the user is required to interact at each step leading the user to eventually work the problem on their own.

An Artifact
CoolMath4Kids has great tutorials on elementary math concepts such as the one featured here, Fractions: Adding and Subtracting Fractions with Whole and Mixed Numbers. While the instructor does offer simple, clear instructions and multiple examples leading to problems for the learner to try, there is no fading. Instead, the learner is expected to work the problem and then scroll over the problem to see the detailed answer. For this beginning level of fractions study, the more phased approach found in Worked Example Principle #1 would have been helpful. 
worked 1-1.JPG


References

Clark, R. C., & Mayer, R. E. (2011). E-learning and the science of instruction: Proven guidelines for consumers and designers of multimedia learning. San Francisco, CA: Pfeiffer.

12 - Segmenting Principle

Brief Definition
Authors Clark and Mayer (2011) support the theory that material of a complex nature should be broken down into the logical sections. Specifically, they suggest that e-learning be broken into “parts that convey just one or two or three steps in the process or procedure or describe just one or two or three major relations among the elements” (p.209). In addition to the lesson content, the authors define the introduction of new terms or concepts needed to digest the content as the Pretraining Principle.

An Artifact
In this series of middle school-directed lessons on Story Elements by Victoria Costley, the author breaks down an eight-part lesson into smaller parts. The one featured here includes three concepts (Exposition, Conflict, and Rising Action), exactly what Clark and Mayer (2011) suggest is appropriate for the Segmenting Principle. However, prior to diving into the first 3 topics listed on the first image below, the author suggests that it would be helpful to first explain story maps (see the second image), a concept used throughout the lesson. In doing so, she has also applied the Pretraining Principle.

segment 1.JPG

segment 2.JPG

References

Clark, R. C., & Mayer, R. E. (2011). E-learning and the science of instruction: Proven guidelines for consumers and designers of multimedia learning. San Francisco, CA: Pfeiffer.

11 - Personalization Principle #3

Brief Definition
The third Personalization Principle suggests that having interaction (or perceived interaction) with the author of the material is beneficial to learning (Clark and Mayer, 2011). This visibility of the author can be accomplished through the first-person thoughts of the author’s personal experience and opinions. It can either be spoken or written and is effective as long as other multimedia principles are applied.

An Artifact
This video that teaches a short lesson about Equations With Variables on Both Sides hints at Personalization Principle #3 because the author inserted a silly introductory scene applying the math concept to real life - something the author may have actually used the concept for. However, it misses the Personalization Principle #3 mark since it isn’t the author personalizing the discussion - the author places himself as a shop lady conversing with Spiderman in the midst of a pastry purchase. While the introduction and final scene are entertaining and would capture the audience, the effectiveness may have increased had the author put himself in the scene and portrayed it as a real-life example (even if the customer was Spiderman!).

personalization 3.JPG

References

Clark, R. C., & Mayer, R. E. (2011). E-learning and the science of instruction: Proven guidelines for consumers and designers of multimedia learning. San Francisco, CA: Pfeiffer.

10 - Personalization Principle #2

Brief Definition
Personalization Principle #2 takes the first Personalization Principle to the next level: use that same friendly, conversational style, but add a graphic (either still or animated) “pedagogical agent” (Clark & Mayer, 2011, p. 191) to the course. Research has shown that these friendly characters actually do improve learning!

An Artifact
The Audiopedia has numerous e-learning videos that are intended to inform the user about various topics. The one featured here, “What is Pedagogy?,” is a great example of an attempt to meet the Personalization Principle #2. A friendly but professional animated lady welcomes users to the “class” and proceeds to talk, however, she uses a computerized, monotonous voice. The script rapidly evolves from a simple definition to a complicated explanation of pedagogy. Therefore, this example is in violation of, among other things, the Personalization Principle #2. In addition, the background screen stays the same throughout the entire 5-minute video. There are no scene changes, no graphics to further learning.

personalization 2.JPG

References

Clark, R. C., & Mayer, R. E. (2011). E-learning and the science of instruction: Proven guidelines for consumers and designers of multimedia learning. San Francisco, CA: Pfeiffer.

Project 4: Multimedia (Stop-Motion Video)

Activity Report 1. Explore your Topic (1-2 hours) Stop motion is a fascinating type of video that everybody loves! My knowledge of it i...